If you’re interested in giving beekeeping a try on a shoestring budget, a top-bar hive might be for you.
The whole idea behind a top-bar hive is simplicity, so it can be made with the least amount of materials and tools when both are scarce and hard to come by. Not everyone likes simple, but I do. It’s kind of like my 1988 Dodge Ram pickup truck. It has a bench seat and a radio. You have to crank the window down to adjust the mirror by hand and push the buttons to lock the doors, and that’s the way I like it.
This hive can be built in a weekend, and you can leave it basic (like my old truck) or fancy it up as much as you want. I’ll show you how to add viewing windows, which are optional. We’ll also explore a few different roof options.
Preparing the hive body
In this first stage of the project, you will cut and prepare the main parts of the hive body; you’ll assemble the body after making the top bars and roof.
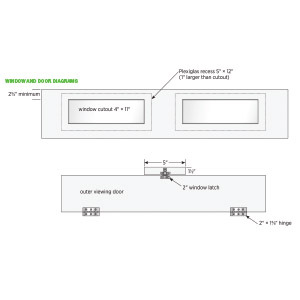
The body is built around a single bottom board, so be sure to start with a nice, straight piece of 1-by-6 for the bottom. One side of my hive has two viewing windows made of Plexiglas. These are optional and can be any size that works. I made mine with two scraps of Plexiglas about 5-inches-wide-by-12-inches-long; both are about 9 inches from each end of the hive body.
If you’d like to include a viewing window or two, Step 4 will help you determine the size and location.
You’ll also need a door to cover the window(s), and this is outlined in Step 5. The reason for the door is twofold: It provides insulation from the cold that the thin plastic can’t provide, and it keeps the interior of the hive dark, which is normal for the bees.
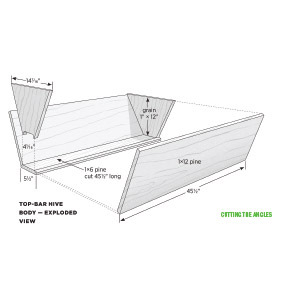
1. Cut the bottom. Cut a 4-foot 1-by-6 to length at 451⁄2 inches. Tilt the table saw blade at 25 degrees and set up the saw to cut the 1-by-6 on-edge; use some scrap pieces to set the fence so that the beveled surface is 3⁄4 inch wide. Also be sure to use a featherboard or other method of holding the board firmly against the fence. Cut the angles along both long edges on the top face of the board, as show above.
2. Cut the ends. The two end pieces are full-width 1-by-12s cut at 25 degrees on each end (cut one end from each 1-by-12 board). Lay out each piece by drawing a centerline across the width of the board (perpendicular to the length). Using the centerline to measure, mark the length of the bottom edge at 41⁄16 inches and the length of the top edge at 147⁄16 inches, as shown in Top-Bar Hive Body – Exploded View above. Cut along the lines with a circular saw or handsaw.
Work tip: If the angles are off slightly, don’t worry. The bees will fix our little mistakes with propolis. Set the end pieces on the bottom, and if the flats matchup they should work. Being too narrow is better than too wide because you can trim a little off the bottom edge to make the board wider at that point. Don’t fret about the height, because it’s going to stick up above the sides anyway.
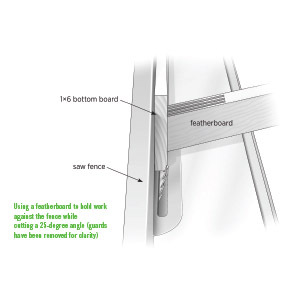
Using a featherboard to hold work against the fence while
cutting a 25-degree angle (guards have been removed for clarity).
3. Cut the sides. Cut the two remaining pieces of 1-by-12 to length at 451⁄2 inches. If you aren’t going to include a viewing window, the sides are done.
4. Make the window cutouts. Determine the size and location of the windows: Each window cutout should be about 1 inch smaller than the length and width of your Plexiglas. The top of the cutout should be at least 23⁄4 inches from the top edge of the sideboard.
Keep in mind that the door will overlap the windows all around, and the top of the door should be about 2 inches below the top of the side, to allow access to the latch when the roof is on.
Use a combination square to measure and mark the cutouts. Drill a 1⁄2-inch hole inside each marked outline for inserting a jigsaw blade to start the cut. (I drilled holes in all four corners, making sure to stay within the lines; this makes it easier to turn the corners.) Cut out the window openings with the jigsaw. Clean up the inside edges with sandpaper and round over the outside edges of the cutouts with sandpaper or a router and roundover bit.
5. Install the window glazing. Place the side board that has the windows facedown on your work surface; the glazing will be on the inside of the hive. Center a piece of Plexiglas over each window opening and trace around the glazing onto the wood. Using a flat-bottom bit in a router, set the bit depth equal to the thickness of the Plexiglas. Clamp some scrap pieces on your board to act as guides for the router, and cut the recess for the glazing, staying inside of the traced outlines.
To mount the Plexiglas, drill 1⁄16-inch holes in it around the outside edges and fasten the glazing with 5⁄8-inch wire nails. (I used three nails on the short sides and four on the long sides of each window.) If you use different fasteners, make sure the pilot holes are slightly larger than the fastener’s shank; if the holes are too small, the plastic will crack.
6. Create the door. Cut a piece of pine about 11⁄2 inches to 2 inches wider and taller than the outsides of the window openings; one door will cover both windows.
I used a piece of scrap wood that was 61⁄2 inches wide and 30 inches long.
Lay the board on a flat surface with the “out” side facing up and the bottom edge facing you. Set the hinges so that one side is against the edge of the board and the other is flat on the table, and mark the hinge screw holes. Drill pilot holes and mount the hinges. I mounted mine about 2 inches from each end.
Center the door over the window openings so the hinges are at the bottom (the door swings down), and mount it to the hive side. Cut a block of scrap wood to size at about 11⁄2 inches by 5 inches. Glue and screw the block above the center of the door, then mount the window latch to the block so the latch barrel extends down over the door to hold it closed.
Making the top bars
There are many different ways to make top bars. Some beekeepers cut strips of wood with a slot down the middle and attach a strip of foundation, or glue in pieces of Popsicle stick. Others leave a small ridge down the middle and prime it with some beeswax. In the past I’ve made two-piece frames with a triangular-shaped ridge nailed on, a method I found on Michael Bush’s website, BushFarms.com/bees.
However, I took this style one step further and made the frames one-piece.
I like this because I know from experience that the bees readily take to these frames and mostly build comb where you want them to. A one-piece design also ensures that the starting edge is centered on the frames.
For this top-bar hive, I made 24 bars at 11⁄4 inches wide for brood and 10 bars at 13⁄8 inches wide for honey. You can make them all 11⁄4 inches if you like. I’ve also heard of using 11⁄2 inch-wide bars for honey frames.
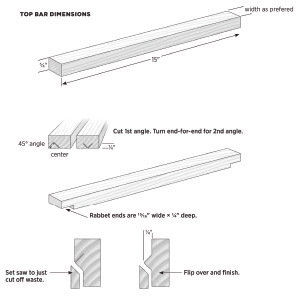
Do some research and decide how you want to make yours. Whatever sizes you go with, make enough to fill the 44-inch inside space along with some scrap for setting up. The method described here yields four 11⁄4-inch-wide strips from a 5⁄4-by-6, and five 13⁄8 inch-wide strips from a 5⁄4-by-8.
1. Cut the top bar strips to length. Cut the 8-foot 5⁄4-by-6 into six pieces at 15 inches long. Set the saw fence to 11⁄4 inches and rip a total of 24 strips. Also cut a few extra pieces from scrap material for setup. Cut the 3-foot 5⁄4-by-8 into two pieces at 15 inches long and rip 10 strips to 13⁄8 inches wide. Again, cut a few extra pieces from scrap material for setup.
2. Cut the triangle slots. Tilt the table saw blade at 45 degrees and set the blade height so the highest point on the blade is 1⁄4 inch high (measuring straight up from the table). Mark the center on the end of one of the strips (or use a scrap piece of the same dimensions). Adjust the fence and make some test cuts so the blade just leaves the center mark. It’s easier to have the fence a little too far away at first and adjust it closer, taking cuts until it is set right.
Once the fence is set, make the angled cut from both ends of the strip, forming a triangular ridge on the bottom face. The point of the triangle should be even with the surface of the board. If it’s lower, your fence is a little too close; if there’s a small flat, rather than a sharp edge, on the triangle, the fence is a bit too far away, which is OK. Run all of your strips through the saw from both ends to cut the triangles.
NOTE: If you make two different-width strips, you will have to set up and run each one separately. The only difference will be the fence being farther away for wider strips.
3. Rabbet the strip ends. Square up the saw blade and set its height at 1⁄4 inch. Set the fence at 15⁄16 inch. Cut a 1⁄4-inch-deep-by-15⁄16-inch-wide rabbet on both ends of each strip.
4. Trim the strip sides. Set the fence to 1⁄2 inch and set the blade height at 3⁄8 inch. Set up one featherboard clamped to the fence to apply downward pressure on the work as it passes through the blade. Mount a second featherboard on the table to push the work against the fence. This allows you to feed the parts through the saw safely. Run the strips through on-edge to remove the material to both sides of the triangular center, as shown.
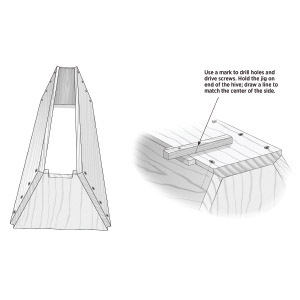
Use a mark to drill holes and
drive screws. Hold the jig on
end of the hive; draw a line to match the center of the side.
NOTE: If you have top bars of more than one width, cut the narrow ones first, then raise the blade to cut the wider ones. You’ll have to raise the featherboard to accommodate the wider top bar, but the fence remains in the same position.
Constructing the roof
You can find all sorts of roof designs for your top-bar hive. The simplest is a flat piece of exterior plywood big enough to overhang the sides, with strips nailed around the edge and a few in the middle to hold it off the top bars (to create an air space). This keeps the hive from getting direct sun on top.
You could also make a similar frame with the plywood, and attach a curved piece of flashing for the top, giving the flashing just enough curve so you can nail it to the sides without kinking.
The roof we’re going to build here calls for more material than some
simpler designs. It’s on the fancy side, but the process is quite simple. Don’t be afraid to gather a few ideas and change or combine them to make your own design. That’s half the fun of building this stuff.
This roof is heavy enough that it might not need to be held on by any means other than its weight. To fancy it up, you could add strips of wood for decoration or even use cedar shingles. Use your imagination.
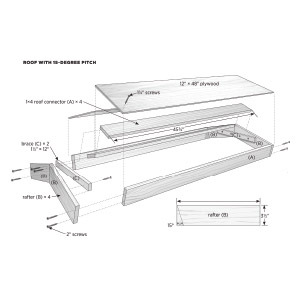
1. Cut the roof connectors. Double-check the length of your hive sides; they should be 451⁄2 inches long. The roof frame will overhang the ends. Set up a stop and cut four pieces of 1-by-4 to length at 453⁄4 inches; these are the roof connectors. Set them aside for now.
2. Cut the rafters and braces. Cut a 15-degree angle on both ends of a 1-by-4, then cut off each at 11 inches from the longest point. Repeat the same process so you have four rafters total. Cut a piece from the remaining 1-by-4 at 12 inches. Rip this into two 11⁄2 inch-wide strips for the peak braces.
3. Assemble the rafter pairs. Set the two pairs of rafters on a flat surface with their angles together to form peaks. Mark the center of the peak braces, spread glue on one side face, then lay them across the rafter joints as shown in Roof With 15-Degree Pitch above (the braces face inside the hive in the finished roof).
Use the head of a combination square to position each brace perpendicular to the rafter joint. The bottom of the brace should be flush with the point where the bottom edges of the rafters come together. Fasten each brace to the rafters with four 11⁄4-inch deck screws.
NOTE: It’s important that the two assemblies are identical because the braces will rest on the ends of the hive when the roof is in place, and it might not sit right if the assemblies don’t match.
4. Complete the roof frame. Drill two pilot holes through the outside faces (opposite the braces) of each rafter end, spacing them 21⁄2 inches apart as shown in Roof With 15-Degree Pitch above. Drill two more holes near the tops of the rafters, on each side of the peak.
Apply glue to one end of each of the four roof connectors (cut in Step 1) and fasten them to one rafter assembly with eight 2-inch deck screws. Flip the whole thing over and install the other rafter pair the same way. (I found it easiest to start all of the screws in the rafters and stand up the connectors on the floor for fastening.)
5. Add the plywood roof panels. Cut two pieces of exterior plywood to size at 12 inches by 48 inches. Draw two guidelines for screws along the length of each panel, 11⁄4 inches down from the top and 1 inch up from the bottom. Set one panel on one side of the roof frame, overhanging each end of the frame equally (the panel edge should be at the peak of the roof). Starting from the center, drill pilot holes and drive 11⁄4-inch deck screws in the top and bottom of the panel and into the 1-by-4 roof connectors, working your way back and forth about every 6 inches toward the ends. This will take any bow out of the plywood (you can also clamp the plywood down on the ends while you work). Drive four screws on each end. Repeat with the second piece of plywood on the other side of the roof.
6. Construct the ridge. You can use metal flashing for the ridge or create a glued-up ridge cap using two pine boards. Another option is simply to fill the joint between the roof panels with exterior silicone caulk. To use flashing, cut a piece of flashing at 48 inches long and at least 4 inches wide, to cover the peak. Fasten the flashing with 3d galvanized box nails, bending over the nails on the underside of the roof panels.
Assembling the hive body
So let’s get that hive body assembled. The first part – attaching the sides and ends – is easier with a helper. Once the body is complete, you simply set the roof on the body to complete the project.
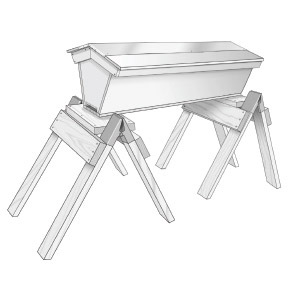
When it came to making a stand for my hive, I thought about building a cradle-type stand, like a sawbuck. Instead, I cut two pieces of 2-by-4 to length at 19 inches and set them 34 inches apart on the crosspieces of a double-hive stand. Then I set the hive on top and drove two 13⁄4-inch screws into each 2-by-4 from inside the hive. This makes the hive steady, and you can shim up the 2-by-4s if needed to get the hive level.
If you don’t have any bees ordered, consider setting up the hive outside and putting a vial of swarm lure inside. You just might be surprised one day to look out and see bees buzzing in and out of your new top-bar hive.
1. Assemble the sides and ends. Drill pilot holes 3⁄8 inch from the ends of both side pieces at 11⁄4 inches, 41⁄4 inches, 71⁄4 inches, and all 10 inches down from the top edge. Apply glue along one angled side of one end piece, and line up its bottom edge with the bottom edge of the side as shown, making sure the edges line up so the bottom will fit properly. Note that the end will be higher than the sides.
Fasten through the side and into the end with four 2-inch deck screws. Repeat with the other side piece, then add the other end piece in the same way.
2. Install the bottom. Check the bottom for fit. The bottom is fastened with screws (you can add glue if desired, but I just used screws), and they must go in at an angle. Make the little jig shown by screwing together two scraps of 3⁄4-inch material at a 90-degree angle. Place the jig on the hive bottom, set your protractor to 25 degrees, line it up with the center of the side’s bottom edge, and draw a line on the jig. Use the line as a guide for driving 13⁄4-inch screws about every 6 inches.
Turn the hive right-side up, add the top bars, then the roof, and your hive is complete.
Beekeeping advice: If you want extra security from wind, install a few eye hooks on the peaks and ends of the hive and use bungee cords to hold down the roof.
Now, you’re all set up for better pollination in the garden, a natural sweetener in the kitchen, and a more complete homestead. All that comes next is adding to the number of hives calling your place home.
Republished from Build Your Own Beekeeping Equipment by Tony Pisano with permission from Storey Publishing (www.Storey.com).



10 Comments
Could you have made it more difficult?????
Get the book referenced, pictures and drawings may be easier than following the text.
Thanks MDog, yes more pictures would help. These instructions seem too complicated, it just seems the author could have simplified them. I am interested in the top bar hive verses the other models like the Langstroth which I built once from simple intructions. But I was thinking that the top bar model would be easier. And it is after looking at other instuctions on the web. Maybe it’s just me (a novice) expecting the authors plans to be easier when he says it’s easy.
But thanks for replying and I’m not discouraged because I know how important it is for some people to take up beekeeping. We need to help the bees in turn to help ourselves.
I need to know more about bees and venom therapy , how we can incorporate this into the system of health provision, also funding for the projects local poor people .
I live in MN and I built one of these hives a number of years back. These hives only work where much of your winter is above 50 deg F. Bees cannot move sideways to new stores in the middle of our northern winters. They can only move upwards into their honey, and the comb in the hive presented here is just not deep enough. You can build one of these, and install a swarm in it, but at the end of the season, you may as well take all the honey and kill the swarm. You’ll be farther ahead. These only work in the southern states.
If you still want to build a horizontal hive, consider the Layens hive:
http://starhouse-observatory.org/node/15
I am currently reading the book “Keeping Bees With a Smile” available here:
http://www.horizontalhive.com/
The book has a lot of good insights that you probably won’t find any other place. Plans for a larger horizontal hive are given but before you go rushing out to build a “Lazutin” hive, consider that he lived in Russia, and he kept a race of bees that isn’t available here in the US. The management practices probably apply everywhere, but the hive is too big for our bees. Scale it down a bit. Dr. Leo Sharashkin told me in a recent E-mail that he plans to have frame plans for a Layens hive and a translation of Layen’s book available this Spring on his Horizontal Hives site. Might be a good idea to visit and sign up for his updates.
If you want to build your own equipment, and your woodworking skills are limited, you may want to consider the Warre (the People’s Hive). Plans for Metric or Imperial are here along with a management strategy:
http://warre.biobees.com/index.html
I am not convinced that the Warre is ideal for the north as the nectar flow is too intense and the brood doesn’t hatch fast enough to empty space for honey storage and thus swarming is encouraged. I think they will still have to be supered in the summer as well as nadered in the spring.
The Warre hive is essentially a vertical top bar hive, and its construction is pretty simple. The top bars are a bit thin and fiddley to cut, but I built a sled roughly the length of a top bar and cut a rabbit in it the size of a top bar on edge and then glued a stop at one end of the rabbit. I insert a board in the sled, slice off one top bar and return, push the board in, and cut the next bar.
Hope this helps. I just didn’t want to see someone with limited resources build one of these Kenyan Top Bar Hives and waste their time and money when there are better alternatives.
The Layens Hive:
http://horizontalhive.com/how-to-build/layens-beehive-design.shtml
And the frames for it:
http://horizontalhive.com/how-to-build/layens-hive-frame-plans.shtml
You’ll be way happier with this hive than the Kenyan Top Bar Hive. Looks like it might be easier to build too.
[…] Οδηγίες › […]
[…] Build This Hive › […]
Thank you for making this available online and for free!
Hi, fairly new beekeeper here. I took the local beekeeper class for my county a few years ago (entirely based on Langstroth). I decided to take a more natural approach, which led me to a top bar hive. I really appreciate the fresh wax, which hopefully reduces contamination/parasite build up, plus I use a lot of wax.
I finally settled on the Les Crowder version of a top bar hive. His book is super thorough and explained things well for my particular mind. I believe that version to be superior in every way except cost to build, which isn’t bad, just not the absolute cheapest! PDF blueprints for it can easily be found, typically found under “Les Crowder top bar hive plans”, NM beekeepers, or something along that line. As a bonus, this hive could be made shorter (26″+, inside) to make a trap/bait hive, or longer (60″ ish) and have two smaller colonies in one hive using the divider wall as long as you have an entrance at both ends.